Herbs for the Happy Tummy

February 22, 2012

I keep encountering moments with friends and colleagues when someone is struck suddenly with a very unhappy tummy, and is in need of quick digestive aid, for a little help when — oops! someone ate wheat bread and shouldn’t have, to help with gas troubles, some weird food combination that left a tummy churning, you name it. The digestive system is of course extremely important to our overall health and well-being, and when there is imbalance, one can even develop depression or anxiety troubles. But right now I am just going to address a group of herbs called carminatives. Essentially, a carminative is an herb that helps expel gas. So using a carminative is more of an acute treatment, though it can be part a long-term strategy to help with chronic digestive woes of any kind. Maybe that sounds icky, the thought that – gasp – your body might in fact have moments when gas is produced, but let’s face it, we all have “moments” and certainly our children too.  At those times, carminatives can be of great assistance, and should always be in your herbal arsenal. I will list some wonderful carminatives to have on hand in the space below, but I also want to point out two ready-made tinctures (alcohol or glycerite extracts) that are fabulous for kids and/or adults.

Image

1. Chamomile. Yes! it’s also a nervine, and therefore great for calming your nervous system, but this delicate apple-spiced tisane (water infusion) has a time-honored tradition of soothing the digestive system. It is especially frequently used for children with its mild, sweet taste, gentle action, and comforting aroma. Chamomile is easily incorporated into a regular routine for adults and children alike and one can include other tasty nervine-carminatives to this blend such as lavender.

Image

2. Lemon Balm. Like many other mints, lemon balm contains a high quantity of volatile oils that work to ease digestive woes. Lemon Balm, with its bright, lemony fragrance, also helps lift the spirits, so if Seasonal Affective Disorder AND tummy complaints are your bane, this is a great herb for you. It is worth noting that fresh lemon balm works best for the nervous system support but dried will help with digestive woes just as well as the fresh herb.

Image

3. Fennel. Known for its mild anise or licorice flavor, all parts of the fennel plant are edible and provide digestive relief. I often keep the seeds on hand with this purpose in mind, and as it is also a great galactagogue (helps promote milk flow in breast feeding women), this is a wonderful herb of choice for women who are pregnant, post-partum, or nursing and experiencing both tummy trouble and the desire to support their milk flow. IT also soothes colic (because of the digestive connection) and so it is great to impart to baby via breast milk or as a water-infusion via spoon or eye dropper.

Image

4. Cinnamon / Cassia. Usually what we think of as cinnamon is actually cassia, a close cousin. True cinnamon is sweeter than cassia, which can have a notably hot taste. The volatile oils are what usually give carminatives their power and both cinnamon and cassia have them in spades, so both are useful for digestion. Cinnamon & cassia are also energetically warming and can work as a ‘catalyst’ to enable other herbs to work better, and to stimulate digestion when food choices have been energetically damp or someone is convalescing. It is worth noting that cinnamon has also shown quite a bit of promise for people with diabetes, as it appears to stimulate insulin activity, helping the body to process sugar more efficiently.

Image

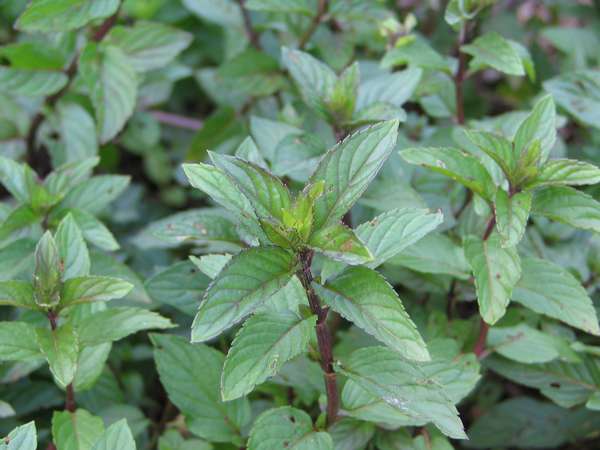
5. Peppermint. I can’t neglect the power of menthol, the source of peppermint’s unmistakeable flavor. Spearmint is a milder mint that can be used almost interchangeably with peppermint, but if you source  good quality dried peppermint, you will be astounded by how intense the flavor is. Mint is very easy to grow and root. I actually picked some from my garden this January, as there was still some (amazingly!) hanging on, and rooted it in my kitchen where it is now happily growing in a sunny window. Peppermint is stimulating and can perk up the mind and the senses, making this a good herb to use to start your day, get your brain in gear, and forge on to new adventures.

Naturally I have many other carminative loves, but for now, I’ll just leave you with those top choices. I would also be remiss in not pointing out Herbalist & Alchemist’s Kid’s Tummy Relief, an absolutely wonderful glycerite formula that tastes delicious and can really help out a kid’s tummy in a pinch. Okay, I keep some in strategic places for myself too, but grown-ups deserve tasty too, right? Another must? Ginger extract (alcohol): I always always always keep a bottle of this in my office, my car, and my home, as it is essentially herbal first aid for myriad complaints.

Feel free to share some of your carminative loves and natural digestive aids!


Make your own Herbal Wines

July 18, 2011

herb Infused wine
Herbal wines
date back thousands of years. Egyptian wine jars have been found with residues of herbs and resins. It makes sense, as we now know that alcohol breaks down the medicinal constituents of plants, making it more bio-available to the body. That’s why we make alcohol extracts as herbal tinctures to deliver botanical chemicals to our body. The famous 12th century German mystic, Hildegard of Bingen, recommended herbal wines such as lungwort wine for emphysema, honey-parsley wine for heart pain, and unsweetened lavender wine for congested liver.

Bitters infused in alcohol have been used in Europe for several hundred years. They usually contain bitter herbs that help with digestion by stimulating bile juices. Bitters have also been traditioanlly added to beer for the same reason.  Angostura Bitters are a famous member of this category and are well-used in hundres of cocktails for a splash of complexity, and to this day only 5 people in the world know the well-kept secret of the herbs used in this special recipe. Though this mexture was hoped to help soldiers in WWI suffering from severe fevers and digestive disorders, it now serves to enliven many of our most special happy hour drinks today. Bitters are usually made with alcohols other than wines, but it might be fun to experiment with bitter herbs when making a more medicinal wine.

There are lots of super tastey concoctions that can be made in your own kitchen. I often make herbal simple syrups to add to gin or vodka drinks for something herbaceous, but it’s really fun to go directly to the source and create an alcoholic beverage that is lively and compex all on its own! This is why going the herbal wine route is worthwhile. Most people can afford a decent white or red wine to start with.

Making Herbal Wines

1. Place Herbs in a bottle (1 oz herbs to 1 pint wine)
2. Pour wine over herbs to fill the bottle (generally a ‘sweeter’ wine w/ about 12% alcohol)
3. Cap tightly and shake well
4. Store in a cool, dark place
5. Shake well every day for 2 weeks
6. Strain herbs.
7. Add sugar or honey to taste (optional), particularly for liqueurs
8. Some liqueurs need maturation time, in which case you might wait a month or more.
NOTE: herbal wines should last about a year. Herbal liqueurs may last longer.

rose infused vodka Rose Petal Wine
(Medicinal Uses: for headaches, heart disease, stomach pain & fever)
600 g rose petals (Rugosa preferred), dried and unsprayed
10 liters combination grape juice and young wine OR all young wine

1. Tie rose petals in a small bag & place in a container with the liquids
2. Infuse in a dark place (covered) for 3 months
3. Filter, pour into a sterilized bottle or jar and store again.

Ref: adapted from an article in The Herb Quarterly by Barbara MacPherson.


Dream Balm – aromatherapy in a tin

July 13, 2011

Dream Balm What’s a Dream Balm? I often get asked this question when people check out my products and come across this Lovely in an aluminum tin. Quite simple! A Dream Balm, or a Tranquility Balm, as I sometimes like to call it, is aromatherapy in a solid form.

The balm is an effective way to utilize the power of pure botanicals for aromatherapeutic uses: rub on the temples or under the nose to ease tension headaches, ease into sleep or a state of calm, relieve anxiety and stress, use in ritual manner to induce a state of relaxation. I find this an incredibly effective balm for all of these reasons, and more.

It can also be used as a lip balm or body balm. And it is certainly safe for children. In fact, children love the nighttime ritual of a scented balm to ease them into dreamland. It is perfectly safe for babies, especially those infants who get fussy at the dinner hour or at bedtime. Just rub a little onto their temples or perhaps a little dab under the nose. You may even treat patches of dry skin or eczema on children, babies, and adults with this great skin salve.   

The base of the Dream Balm itself is made from nourishing natural oils and waxes (beeswax). Safflower and sunflower oils, are not clogging and have a nice consistency and shelf life. The oils have been infused with organic herbs, including lavender, chamomile, rose, and mugwort. Rosemary oil extract & vitamin E are added as potent anti-oxidants to protect the balm.

Chamomile provides wonderful anti-inflammatory action (topically) and has aromatherapeutic qualities all by itself. It’s a remarkable, calming herb that not too long ago deserved a post all its own.
Lavender is one of my absolute favorite herbs for all reasons, and its aromatherapeutic, calming activity is well-established. Topically, lavender is an analgesic, which means that it helps relieve pain. Lavender is a wonderful herb and essential oil for topical application to scrapes, insect bites, and burns, and I include it in my All-Purpose healing salve. Need I say more? The balm smells strongly of lavender.
Mugwort is a wonderful herb that grows everywhere here in the NorthEast, favoring waste places and empty lots. However, it’s an herb with an old history as a “dream herb”. People would hang it over their beds to bring good dreams at night, and the dried herb has traditionally been stuffed into dream pillows. I have a special love for this fragrant member of the Artemesia family.
Rose imparts a feeling of comfort and well-being, lifting the spirits and easing the mind. It’s a romantic touch to the Dream Balm, and a welcome addition.

Once again the balm is an excellent, alll-purpose body salve, so you can *certainly* use it to soothe the skin, including insect bites, scrapes and scars, dry skin, and eczema conditions. Lavender is excellent on burns for its analgesic properties, as noted above. The infused chamomile also makes the balm anti-inflammatory. So I tend to think of it as a medicinal balm that also has aromatherapy — these plants give us gifts from all angles, as you can see.

SALE! In honor of the lovely Dream Balm, you can purchase a nice 5 oz container of it in my Etsy store right now for $11 ($3 off!). This size tin will last a long time and travels well. You’ll love it!


Make your own fresh herb tincture

April 16, 2011

I have long wanted to include some ‘practical’ instruction in my blog for the all important preparations that all herbalists and family healers use on a regular basis. This post will be devoted to a simple alcohol extract of a botanical, called a “tincture”. The extracting can actually be done with cider vinegar or glycerin, alternatively, though alcohol does work best. It is important to note that some herbs are better taken as infusions or decoctions, particularly if the vitamin content is what one is after (i.e. nettles).  It is also important to note that some herbs are absolutely best taken as a *fresh* herb tincture rather than a *dried* herb tincture. This post is for making tinctures from *fresh* herbs. Some examples of herbs that should be tinctured fresh are turmeric rhizome, ginger rhizome, St. John’s wort, Milky oat tops, and skullcap. Other herbs I prefer to tincture fresh are motherwort and tulsi.

Oat Tops in the Milky Stage

Oat Tops in the Milky Stage

Step 1:

Organize the necessary container for tincturing. It should be big enough to hold all the herb you would like to tincture. There should not be a lot of excess room in the jar, however.

Jar and herbs for tincturing

Step 2:

Put the herbs in a glass jar. I have a gallon sized glass jar here and I’m using fresh oat tops in the milky stage, shipped to me from Pacific Botanicals organic farm in Oregon.

pouring grain alcohol onto the herbs

Step 3:

After the herbs are in the jar, pour 95% (190 proof) grain alcohol over the fresh herbs. The percentage of alcohol you use is probably the most important part of tincturing aside from the quality of the herbs used. The percentage of alcohol for fresh herbs shouldn’t dip below 50% or the tincture will probably spoil. Because fresh herbs contain a lot of water already, you can assume that just by using fresh herb, you’ll be diluting the % of alcohol in the preparation. So, if you use (40%) 80 proof vodka, for instance, you may end up with a tincture that is only 20% alcohol, and that tincture would certainly spoil. Many herbalists use 100 proof (50%) vodka and have success, even with fresh herbs. I prefer to use a higher proof for fresh. Using 100 proof (50%) vodka for *dried* herbs is certainly okay, though more complicated formulas are used by professional herbalists.  Keep in mind that some herbs require glycerin at about 10%, including milk thistle seed.

So, you pour the alcohol over the herbs and fill the jar to the top. Leave about 1/2 – 1 inch between the alcohol and the rim of the jar. Try to make sure all of the herbs are under the liquid.

tinctured oat tops
Step 4:

Use a chopstick or spoon to press the herb down and stir in order to release any air bubbles that may be trapped in the jar.

Step 5:

Cap the jar. I often like to put a piece of wax paper between the rim and lid so that the lid doesn’t ‘stick’ to the jar. It’s not that this is really a problem, because you can run it under hot water, but it just makes it easier.

Step 6:

Label the jar with the herb, date, and percentage of alcohol. Store in a cool/dark place and allow to do its tincturing  magic for 4 – 6 weeks. You can really leave it for longer if you don’t get to it in that time frame.  I have left herbs in 180 proof alcohol for a *year* and it doesn’t go bad because of the high alcohol content. Sometimes I do up to 3 gallons at a time, so I don’t always decant everything right away!

Step 7:

When you decant, strain the herbs out and compost them after squeezing the alcohol out of them. You can wring out the herbs with a thin, clean dishcloth or cheesecloth. There are also professional herb presses that are available for just this purpose. The herbs will often become quite dessicated, actually, so sometimes it is incredibly easy to extract as much alcohol as you are going to!

Be sure to label your decanted tinctures with the Date and the Herb, as well as the alcohol used. Keep in mind that the % of alcohol is no longer 95%!!! Though it’s not easy to exactly determine, it’s probably closer to 50%, depending on the herb used.

Resources:

Gladstar, Rosemary, Herbal Healing for Women, 1993.
Weed, Susun, Healing Wise, 1989.
Tierra, Michael, The Way of Herbs 1998
Hoffman, David, Medical Herbalism, 2003.
Tilgner, Sharol, Herbal Medicine, 1999.

Good luck with your first tincture. Feel free to comment below if you have questions!
My tinctures can be found on my Etsy site.


Horseradish (Armoacia Rusticana): International Herb of 2011

February 18, 2011

Horseradish Horseradish? That seems to have been everyone’s response to the choice of International Herb of 2011, despite this herb’s long use as a medicinal herb. Not only is horseradish’s spicy, peppery taste a flavor booster, but it has the ability to clear the sinuses (you know what I am talking about!) and also has a range of antibacterial activity, which makes it additionally useful for infections. A powerful diuretic, horseradish has been used throughout the centuries to treat kidney stones and similar problems. Not surprisingly, horseradish is also great for indigestion and putrefaction in the digestive tract. As an expectorant, horseradish is helpful with lung problems, including asthma and coughs, and is additionally useful for arthritis. To add to the laundry list of uses, horseradish can be used as a skin treatment to remove blemishes and lighten discoloration; it is a successful vermifuge for expelling worms and parasites; it’s an immune stimulant that can strengthen a worn down system and as an anti-oxidant, helps counter the negative effects of pollution and stress; it’s also a detoxifier for the liver and spleen. It can even be held to the nose of a nursing baby who can’t nurse well because of a stuffy nose (the fumes will be strong for the baby, who may cry for a minute because of it, but it’s effective and safe).

For a sinus remedy, the famous herbalist, Dr. Christopher, recommends the following: “Start with 1/4 teaspoon of the freshly grated root and hold it in your mouth until all the taste is gone. It will immediately start cutting the mucus loose from the sinuses to drain down the throat. This will relieve the pressure in your sinuses and help clear infection.” Incidentally, the grated root is apparently sweeter and milder when fresh than when purchased from the store.

I think horseradish is perhaps best known as one of the five bitter herbs (along with coriander, horehound, lettuce, and nettle) eaten historically during the feast of the Passover Seder.

I’m chagrined to admit that despite the obvious strength of horseradish’s energy, I haven’t used this herb very much myself, and could also do to incorporate it into my diet more often. Herb Companion has posted a number of culinary recipes for the use of horseradish, including those listed here. Leek and Celery Root Gratin with Horseradish looks really intriguing, and just like I enjoy mashed potatoes with dijon or whole seed mustard, I’m sure I’d love the peppery addition of horseradish to a creamy potato dish.


The Healing Power of Herbs: Liniments

November 17, 2010

Oil with herbs Liniments. Hm. Sounds vaguely medicinal, right? I remember once going to a bar that was ‘inspired’, I take it, by herbal formulas. Some drinks (shall I say ‘concoctions’?) boasted the inclusion of herbal tinctures of elderflower, ginger, or lavender. Not a bad thought at all, as we often use more familiar alcohol extracts of vanilla or orange peel in herby libations. However, there was a drink that supposedly included the use of an herbal liniment…..HA HA HA HA. Well, that’s the herb snob in me, I’m a little ashamed to admit. Why? Because liniments are for external treatment, not for cocktails. In fact, many liniments use rubbing alcohol as a base which sounds downright raunchy as an addition to an evening beverage. In truth, a liniment could essentially be made the same way as an extract meant to be taken internally, despite the fact that the definition implies that it is used externally. It can also be made as an infused oil, which, if made with the right kind of oil, can be a fabulous culinary addition! Still, I feel some “nameology” needs to be in order.

Moving on.  A liniment is most often made as an alcohol extract. The purpose is to provide a vehicle for the important chemical compounds in herbs that would be used for external application. I have included a DIY recipe below for a ginger liniment that is made with a neutral oil, and some additional possibilities are olive oil, safflower oil, or sunflower seed oil. Essentially an infused oil, this ginger liniment works great as a massage oil post-exercise to relieve aches & pains. It is also a great treatment to increase circulation. Try on arthritic joints, on sore muscles, and troublesome joint pain. Best used twice a day at least!

gingerDIY RECIPE : Ginger Liniment

3″ piece fresh ginger
1/4 cup almond oil

Grate ginger and combine with oil in a non-reactive (non-aluminum) saucepan. Cover and heat on low heat for one hour. Make sure you have this at the lowest possible temperature to avoid the oil overheating or ‘burning’. Remove from heat and steep for another hour. Strain out ginger. Pour oil into a 4 oz colored glass bottle with a tight-fitting screwtop.

Alternative: Use 1/4 cup grain alcohol instead of oil. Infuse for a minimum of 6 weeks (without heat) in a dark place. Apply externally with a cotton pad to relieve aches and pains. Do not apply on broken skin.

NOTE: whenever applying an external remedy, do a test patch first to make sure you are not allergic to any of the ingredients. Apply a small amount on the inside of your arm and wait 24 hours to make sure you won’t have any reaction. Some minor redness can be a natural side effect of a ginger liniment, as increased blood circulation may bring blood flow to the surface of the skin.


Making Infused Honey with Household Spices & Herbs

March 26, 2010

cinnamon infused in honey I wrote this DIY post for a local group of handmade artisans here in Philadelphia, for the Handmade Philly blog. But what could be a better project for my own readers than herb-infused honey, using readily available sprices from your kitchen cabinet and herbs fresh from the garden? Pop on over the Handmade Philly and check out the post.


Guest Blogger for Herb Companion: yours truly

April 21, 2009

plantainI have  really enjoyed reading the herby magazine Herb Companion in recent years and have had fun discovering new recipes, herbal histories, and lots of fun information and resources. It’s great to have the feeling of an herbal community through periodicals, blogs, and web-based information on top of all that book learnin’. Recently, I decided to begin guest blogging for Herb Companion and it’s a lot of fun, as you all know how much I love to share information about herbs, nutrition, and natural body care! Be sure to check out my latest post on wild crafting healing herbs to make your own infused oils and medicinal salves.


Bay ~ Laurus Nobilis ~ International Herb of 2009

February 26, 2009

bay_1I have been wanting to blog about the wonderful qualities, the spicy sweetness, and the versatility of the lovely bay leaf for a number of days now. The popular herby’s publication, Herb Companion, published a lovely little article on Bay, highlighting its associated legends and lore, including the story of Daphne, who transformed into a laurel tree when being pursued by Greek God, Apolllo. Bay is the herb of poets, oracles, warriors, statesmen and doctors ~ truly a noble herb!

Bay is  a perennial native to the Mediterranean, and as such, requires wintering indoors for those living  in colder zones.  Susan Belsinger’s article in Herb Companion tells us of its medicinal qualities, for treating headaches, stomachaches, wounds and insect bites. Today it is used externally for muscular aches and pains, including arthritis. The leaves are antimicrobial and fungicidal, and so bay is a valuable aid in treating colds, flues, congestion, and viruses. It stimulates digestion, regulates menstruation, soothes inflammation, fights infection, stimulates urinary elimination and calms the nervous system.

bay_2Along with many other great factoids about this lovely herb, Susun published a wonderful recipe for bay-infused chocolate pudding that I just had to post! This is the real thing, and very easy to make. The subtle fragrance of fresh bay (find at your local grocery store), rather than dried, is all you need to make something special out of a big pot of chocolate pudding, as if it wasn’t special enough already. My toddler and I took out comforting spoonfuls of one of the loveliest comfort foods around.

Chocolate Pudding with Bay (serves 6)

Ingredients:

2 cups half-and-half or light cream
3 large fresh bay leaves
3 Tbsp cornstarch
2/3 cup sugar
2 pinches salt
1/4 cup unsweetened cocoa
1/2 cup milk
3 oz. bittersweet or semisweet chocolate, cut into small pieces
1/2 tsp pure vanilla extract (no imitation stuff here!)
Whipped cream (not the canned stuff either!), optional

1. Heat half-and-half with bay leaves in a heavy-bottomed saucepan over medium heat. When half-and-half startes to bubble around the edges of the pan, remove from heat and cover. Let stand for 30 min.
2. After bay has infused the cream for nearly 30 minutes, combine cornstarch, sugar, salt, and cocoa in a bowl and whisk in milk. Pour mixture into the warm cream and place over moderate heat. Continue whisking and cooking and pudding thickens (this doesn’t take too long)
3. When pudding begins to bubble and come to a boil, stir and boil for 1 minute. Remove pan from heat and whisk in chocolate pieces until they are melted. Add vanilla and stir well. Carefully remove bay leaves and pour pudding into six ramekins or custard cups (or a nice sized bowl!)
4. Place custard cups on a plate or pan and allow them to come to room temperature. Refrigerate until chilled; at least 30-45 min. Serve at cool room temp and garnish with whipped cream if desired (or you can pour it into a bowl and pop it in the fridge)

YUM!